In this tutorial, we’ll cover how to leverage the power of Advanced Custom Fields Pro to create complex custom widgets. If you would like to learn more about creating custom widgets, have a look at the Widgets API in the WordPress Codex.
Create a Custom Widget
First we need to create a new file for our custom widget. Let’s name it acf-custom-widget.php and add it in a new directory to keep things nice and tidy. I recommend the following directory structure, but feel free to place the file anywhere you like:
-- theme
---- inc
------ plugins
-------- acf
---------- acf-custom-widget.php
Next let’s include our new file in our functions.php file. Open up functions.php and add the following code:
include_once( get_stylesheet_directory() . '/inc/plugins/acf/acf-custom-widget.php');
Now we’re ready to add the custom widget code to our new file. Open acf-custom-widget.php and add the following code:
<?php

/**
 * A custom ACF widget.
 */
class ACF_Custom_Widget extends WP_Widget {

    /**
    * Register widget with WordPress.
    */
    function __construct() {
        parent::__construct(
            'acf_custom_widget', // Base ID
            __('ACF Custom Widget', 'text_domain'), // Name
            array( 'description' => __( 'A custom ACF widget', 'text_domain' ), 'classname' => 'acf-custom-widget' ) // Args
        );
    }

    /**
    * Front-end display of widget.
    *
    * @see WP_Widget::widget()
    *
    * @param array $args     Widget arguments.
    * @param array $instance Saved values from database.
    */
    public function widget( $args, $instance ) {
        echo $args['before_widget'];
        if ( !empty($instance['title']) ) {
            echo $args['before_title'] . apply_filters( 'widget_title', $instance['title'] ). $args['after_title'];
        }

        echo get_field('title', 'widget_' . $args['widget_id']);


        // Place your ACF code here


        echo $args['after_widget'];
    }

    /**
    * Back-end widget form.
    *
    * @see WP_Widget::form()
    *
    * @param array $instance Previously saved values from database.
    */
    public function form( $instance ) {
        if ( isset($instance['title']) ) {
            $title = $instance['title'];
        }
    ?>
    <p>
      <label for="<?php echo $this->get_field_id( 'title' ); ?>"><?php _e( 'Title' ); ?></label>
      <input class="widefat" id="<?php echo $this->get_field_id( 'title' ); ?>" name="<?php echo $this->get_field_name( 'title' ); ?>" type="text" value="<?php echo esc_attr( $title ); ?>">
    </p>
    <?php
    }

    /**
    * Sanitize widget form values as they are saved.
    *
    * @see WP_Widget::update()
    *
    * @param array $new_instance Values just sent to be saved.
    * @param array $old_instance Previously saved values from database.
    *
    * @return array Updated safe values to be saved.
    */
    public function update( $new_instance, $old_instance ) {
        $instance = array();
        $instance['title'] = ( ! empty( $new_instance['title'] ) ) ? strip_tags( $new_instance['title'] ) : '';

        return $instance;
    }

} // class ACF_Custom_Widget

// register ACF_Custom_Widget widget
add_action( 'widgets_init', function(){
  register_widget( 'ACF_Custom_Widget' );
});
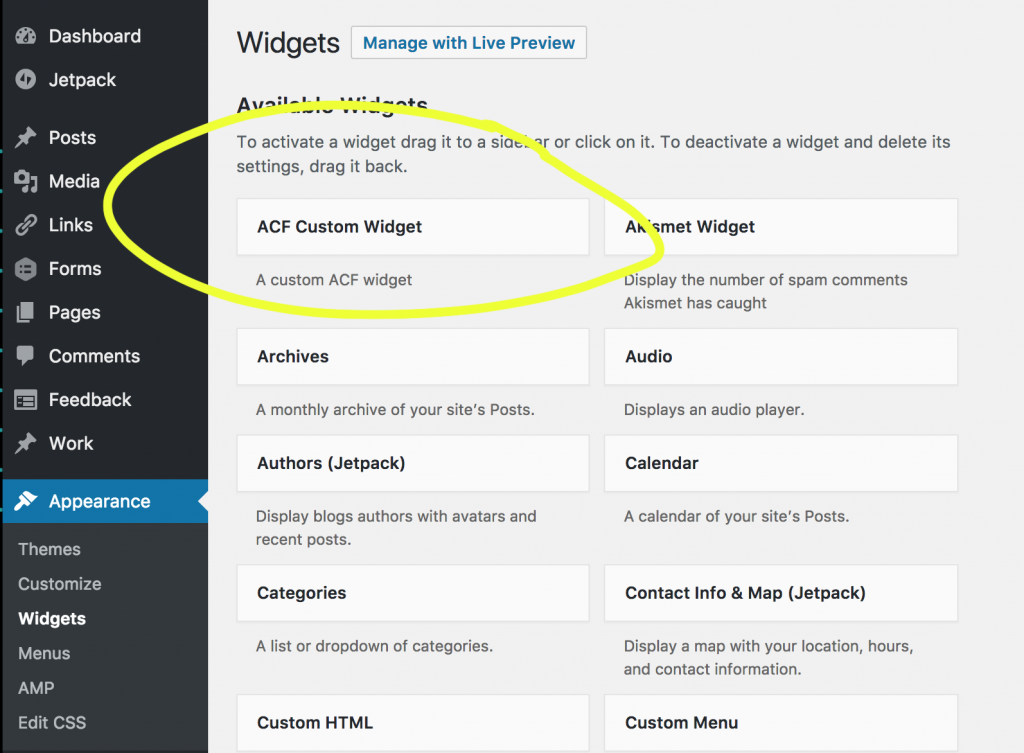
Let’s make sure everything is working properly. Log in to your dashboard and navigate to Appearance > Widgets. You should now see our new ACF Custom Widget listed among the available widgets.

Create an ACF Field Group
Now it’s time to create a new field group for our widget using Advanced Custom Fields. I’m going to name mine ‘Custom Widget’ and add a simple ‘textarea’ field to the group. Make sure to select ‘Widget’ in the locations menu and then set it equal to our new custom widget.

All custom fields that you add to this new group should now appear in your widget. The last thing we need to do is add the custom field code to our widget.
Add Custom Fields Code
It’s time for the good part. Open up the acf-custom-widget.php file we created earlier and add the custom field code.
<?php

/**
 * A custom ACF widget.
 */
class ACF_Custom_Widget extends WP_Widget {

    /**
    * Register widget with WordPress.
    */
    function __construct() {
        parent::__construct(
            'acf_custom_widget', // Base ID
            __('ACF Custom Widget', 'text_domain'), // Name
            array( 'description' => __( 'A custom ACF widget', 'text_domain' ), 'classname' => 'acf-custom-widget' ) // Args
        );
    }

    /**
    * Front-end display of widget.
    *
    * @see WP_Widget::widget()
    *
    * @param array $args     Widget arguments.
    * @param array $instance Saved values from database.
    */
    public function widget( $args, $instance ) {
        echo $args['before_widget'];
        if ( !empty($instance['title']) ) {
            echo $args['before_title'] . apply_filters( 'widget_title', $instance['title'] ). $args['after_title'];
        }

        echo get_field('title', 'widget_' . $args['widget_id']);


        // BEGIN ACF CODE
        if ( get_field('content') ) {
            echo '<div class="content">'
                . get_field('content') .
            '</div>';
        }
        // END ACF CODE


        echo $args['after_widget'];
    }

    /**
    * Back-end widget form.
    *
    * @see WP_Widget::form()
    *
    * @param array $instance Previously saved values from database.
    */
    public function form( $instance ) {
        if ( isset($instance['title']) ) {
            $title = $instance['title'];
        }
    ?>
    <p>
      <label for="<?php echo $this->get_field_id( 'title' ); ?>"><?php _e( 'Title' ); ?></label>
      <input class="widefat" id="<?php echo $this->get_field_id( 'title' ); ?>" name="<?php echo $this->get_field_name( 'title' ); ?>" type="text" value="<?php echo esc_attr( $title ); ?>">
    </p>
    <?php
    }

    /**
    * Sanitize widget form values as they are saved.
    *
    * @see WP_Widget::update()
    *
    * @param array $new_instance Values just sent to be saved.
    * @param array $old_instance Previously saved values from database.
    *
    * @return array Updated safe values to be saved.
    */
    public function update( $new_instance, $old_instance ) {
        $instance = array();
        $instance['title'] = ( ! empty( $new_instance['title'] ) ) ? strip_tags( $new_instance['title'] ) : '';

        return $instance;
    }

} // class ACF_Custom_Widget

// register ACF_Custom_Widget widget
add_action( 'widgets_init', function(){
  register_widget( 'ACF_Custom_Widget' );
});
Conclusion
That’s pretty much it! With the basic structure for our widget in place, we now have the ability to create complex widgets using any number or combination of ACF field types.
Thanks for this great tutorial. The problem is that i want to customize this widget for every post. So i want to edit the widget content in the post editor instead on the widget TAB.
How can i do this?
Hi Andrew,
Did you find how the solution you were looking for? Because I am wondering if I can just use post editor.
Thanks,
Hardik